This is a follow-up to my post a couple of weeks ago, The art of LEGO railway track. I’m coming back to the topic because I had a small problem with a platform I’d built (from a Blue Brixx set) – it’s not quite compatible with my short 8-stud-wide train (also from Blue Brixx, modelled on a locomotive and coach from the famous Rheingold train).
(By the way, I’m not on commission from Blue Brixx. I’m fairly sure they don’t know who I am.)
And then I began to question whether I’d made the right choice about the cosmetic sleepering (even though I justified my decision in the previous post). LEGO’s inherent scale ambiguity really doesn’t help those of us with chronic indecisiveness! (Or should that be indecision?)
So I’m afraid I’m going to have to get even more nerdy this time. Yep!
I’m going to talk about some of the problems of scale in LEGO, whether that’s for trains, buildings or spaceships. And then, with an eye specifically on railways that have some kind of nod towards realism, I’m going to take a detour through the multiple types of gauge in real railways, and the treatments of gauges in toy train sets and scale model railways, before (hopefully) circling back to LEGO (and other brick) trains.
What scale is LEGO?
Last time I said that making a model of a real-world prototype is always going to be an exercise in compromise, thanks to the relatively restricted palette of bricks tied to a stud-based grid. It’s not quite a 3D version of pixel art (Minecraft would be closer!), but it has elements in common.

There is no one definitive scale for LEGO models. After all, how long is a piece of string? How big is a brick? Even LEGO’s own sets based on things in the real world vary considerably, as we can see by looking at a couple of random examples.
LEGO claims that its K2 telephone box (set 21347), including its scenic base, is over 31 cm high – so let’s call it 30 cm for the box itself. It looks as though it’s 11 studs (8.8 cm) wide. The original 1924 phone box was 9 feet (274 cm) tall and 3 feet 4 inches (102 cm) wide. Going by the height, that’s a scale of roughly 1:9, though going by the width it’s more like 1:12. Regardless, it’s pretty big.
Now consider LEGO’s Eiffel Tower (set 10307), which is around five times the height of the phone box, at 149 cm. But the original is 330 m tall, so the scale of the LEGO model is around 1:220. A much smaller scale.
‘Minifig scale’
When it comes to things that aren’t modelled on anything in the real world, but designed purely for their aesthetic appeal or playability, the notion of scale is perhaps irrelevant. If you’re building spaceships, let your imagination rip: anything goes!

However, a lot of us want to create an imaginary world that people could conceivably inhabit, whether it’s a house, a street or an entire city. When I first played with LEGO, any people in my fictional world had to be made out of bricks, or transplanted from a non-LEGO universe. The bizarrely proportioned minifigure (or minifig) arrived on the scene a little too late for me.
Because of the minifigs, most of which are the same size, a lot of creators work in ‘minifig scale’, designing buildings, cars, buses, spaceships and, yes, trains to accommodate these strange creatures. And that makes a lot of sense from a playability perspective. (I’m not sure who coined the term ‘minifig scale’ for this, but it’s definitely been around for a while.)
Tom Alphin (Brick Architect) estimates minifig scale to be something like 1:42 vertically and 1:25 horizontally (front-to back or left-to-right). While it would be perfectly possible to build squat structures using the same scaling factors, they would take up a lot of space. So buildings – and trains – are often actually stretched vertically rather than horizontally! A common compromise then is to include one chair or seat where there might be two or even three in real life.
Mini-doll scale

I only recently discovered that LEGO makes some other small people, the mini-dolls in their Friends theme. These look much better to me than the minifigs, though these four short videos by Claire Kinmil (Brickomotion) entertainingly pit the two against each other, ending up with a list of pros and cons for both.
Tom Alphin notes that the mini-dolls are better proportioned than the minifigs, and estimates their scale to be somewhere in the region of 1:38, possibly as large as 1:35. Interestingly that aligns pretty well with the 1:36 scale I came up with in my previous post. Hmm.
Anyway, time for a tangent. Let’s go down our first rabbit hole.
What is a gauge?
On a real railway, a gauge is a standard size for something, or an instrument used to measure such a size, or a device that detects when something doesn’t conform to the standard. I’m not going to talk about the second and third senses.
Among the standard sizes important to railway engineers are track gauge, vehicle (or loading) gauge and structure gauge.
Track gauge
If you only know one kind of railway gauge, it’s probably track gauge, which is usually the distance between the insides of the two running rails, on straight track, measured from a certain point on the head of the rail. (On curved track the gauge is widened slightly. And for some gauges, the distance is measured between rail centres.)

Railways around the world use a huge variety of different gauges, but a few are particularly widely used.
Standard gauge is 1435 mm, and is by far the most common gauge for most kinds of railway, from high-speed rail to tramways. Anything greater than this is known as broad gauge, while anything (substantially) less is known as narrow gauge. Broad gauges include Russian gauge (1520 mm), which is second only to narrow gauge in number of track-kilometres in use, Iberian gauge (1668 mm) and Indian gauge (1676 mm). Among narrow gauges, metre gauge (1000 mm) and 3 foot 6 inch gauge (1067 mm) are widespread.
To avoid confusion (if it’s not too late for that!), I’ll limit myself to talking about standard gauge for the rest of this post.
Vehicle gauge and structure gauge
I’m only going to talk about these briefly, because the relevant standards (even just for mainline British railways) are lengthy and technical, and I don’t pretend to know anything but a small fraction of how these gauges are used in practice.
Roughly speaking, the vehicle gauge is a set of measurements describing the space above and to the sides of a track that parts of a locomotive, freight wagon or passenger coach may occupy during its passage along the track. (In the case of open freight wagons, this space must include any load carried, and is known as the loading gauge.)
The structure gauge, on the other hand, is a set of measurements describing the space above and to the sides of a track that must be kept clear of fixed infrastructure, such as signals, platforms and bridges.
The space within the structure gauge but outside the vehicle gauge is the guaranteed clearance between trains and the structures they pass. There should also be clearance between trains passing on neighbouring tracks.
Structure gauges can vary hugely from country to country, even when the track gauge is the same. Standard gauge railways in continental European countries typically accommodate taller and wider trains than in Britain (double-deck passenger trains, for instance). And many lines in North America, especially freight lines, have structure gauges that are even more generous.
Time to hop down the second rabbit hole.
From toy trains to scale models
At some point in my childhood I ‘progressed’ from LEGO and clockwork ‘toy’ trains to ‘model’ railways, which I saw as more grown-up and serious – something I was less likely to be mocked for enjoying (at least for a while!). I only ever had 00 – ‘double oh’ – scale/gauge trains despite a frustration with its shortcomings, which in some ways are not unlike LEGO’s.
But what do I mean by ‘scale/gauge’? Aren’t scale and gauge two different things? Yes. Model railway standards are a mess.
The earliest model railway standards emerged from the world of toys. German toymaker Märklin (best known for doll’s houses at the time) realised there was an opportunity to sell not just a single toy train but an entire system that would keep customers coming back. A system of compatible rolling stock, track and accessories needed a standard.
They weren’t particularly concerned with accurate scale modelling, so it made sense that the important thing was just to have standards for train wheel sizes and corresponding sizes of track. They introduced systems with track gauges of 45 mm (called no. 1 gauge), 64 mm (no. 2 gauge) and so on.
The painful advent of scales
Later, as people tried to model trains more accurately, scales were derived from Märklin’s track gauges. Assuming a standard gauge (1435 mm) prototype, no. 1 gauge (or Gauge 1) corresponds to a scale of 1:31.9 (usually rounded to 1:32), and no. 2 gauge (or Gauge 2) corresponds to a scale of 1:22.4 (usually 1:22.5).
The exact sequence of events isn’t clear to me, but at some point Märklin, or maybe Bing, introduced Gauge 0, a smaller system than Märklin had envisaged (though we’d now consider it on the large side, almost as big as L-gauge!). It has a track gauge of 32 mm, from which the derived scale is 1:44.8. In continental Europe, this is rounded to 1:45, but Britain to this day perversely mixes metric and imperial units, calling it 7 mm : 1 foot (which is nearer 1:43.5). Not far off, but annoyingly wrong! And modellers in the US have it even worse with a scale of 1:48, for which the correct gauge would be just under 30 mm.

Later, an even smaller scale (though by no means the smallest) came on the scene. At first various manufacturers started to make railway systems with a gauge of 16 mm, half that of Gauge 0, for a scale of 1:90. For some reason, it wasn’t called Gauge −1 (!). Instead it was called 00 (Null Null ‘Zero zero’). But after a short time the slightly larger 16.5 mm gauge took off, under the name H0 (Halb-Null ‘Half zero’) – even though it was now slightly bigger than half of Gauge 0. The scale was at least consistent with the gauge, at 1:87.
In Great Britain, we went our own way again, keeping the 00 name, but for 16.5 mm gauge track and the larger scale of 4 mm : 1 foot (1:76.2). That remains the case to this day. So now you can see why I said 00 scale/gauge. It’s an unholy combination.
(The rationale for British 00 Gauge, aside from the mixed units at least, was that the prototypically smaller British locomotives – smaller vehicle gauge, remember! – were too small at 1:87 scale to fit the motors available at the time. But despite a change of scale, it seemed expedient to keep the non-scale track gauge so that there was some interchangeability between parts for 00 and H0.)
There are many other standards, with various approaches to the conformity of track gauge to nominal scale, but I think that’s quite enough for my brain right now. I don’t know about yours. Historical details above should be taken with a pinch of salt: they’re partly based on my own recollections of things, and partly culled from English and German Wikipedia, and I am not a historian by any means.
Back to LEGO
The 6 foot-by-4 foot model railway I built with my dad was in 00 and had quite a mishmash of track types: Hornby System 6, Hornby/Tri-ang Super 4 and some of my dad’s old Trix Twin 3-rail AC track with most of the centre rails snipped out!
However, for many years after that I aspired to fine-scale modelling (at least from a metaphorical armchair), first considering Scalefour standards (4 mm : 1 foot, with a scale track gauge of 18.83 mm), and later 2 mm FineScale (2 mm : 1 foot, with a scale track gauge of 9.42 mm). But my perfectionist tendency and almost complete lack of practical skills prevented me from even starting! I’m still in awe of what some people can do in these scales. I never even considered ScaleSeven, the fine-scale counterpart to British 0 Gauge, because it was simply impractically large …
And yet here I am contemplating modelling (or playing trains!) in LEGO (and clones), and the scale (whatever we decide that means, but it’s certainly more confusing than 00) is almost certainly bigger still!
On track
The following diagram of standard LEGO track geometry is based on the one shown on the L-gauge website – which goes to show that L-gauge modellers take this stuff pretty seriously! (I’ve redrawn it as an SVG graphic, and made some small changes.)

From this, it’s clear that my previous assertion that the gauge is 5 studs (40 mm) only applies to the centreline gauge. The track gauge, measured in the usual way, between the insides of the running rails, is 37.5 mm (which isn’t a nice round number of studs). Given the loose relationship to a scale model of track, it probably doesn’t make much difference.
To consider another aspect of the above diagram, the rail, which isn’t even shaped quite like a real rail, has a rail head (top part) that is 2.5 mm wide and 6.4 mm above the sleeper. A real rail used on a typical mainline railway might have a rail head that is around 70 mm wide and around 160 mm high (there are many subtly different standards). So at least the width and height of the rail aren’t too far out of proportion to each other.
And a rail that is 2 plates high is a good choice within the LEGO system. Adding the 1-plate high track base to that, LEGO track is 1 brick high, which is pretty nice.
Here you can see prototypical track overlaid on LEGO track, both scaled to the same track gauge, with the lower diagram raising the effective sleeper level by one plate using tiles as cosmetic sleepers:

But 1:28 or thereabouts is quite a bit bigger than the 1:36 I came up with before (based on the centreline gauge) or the 1:38 we’d get from the track gauge in the diagram. So LEGO rails are definitely overscale. Luckily, ballast plates and sleeper tiles do a good job of hiding the lower part of the rail, giving it a smaller visual profile. (And it’s nice to see that the LEGO sleeper length is more or less to scale at 1:38.)
A quick note on how to space sleeper tiles: my original decision may not have been ideal. For one thing, I haven’t thought about curved track, or switches and crossings. Also, it does mean that you need three different tilings even of S16 straight tracks, simply because 3 doesn’t go into 16. For that reason, I’m beginning to have my doubts about its practicality, especially for modular builds.
Turning to wheels
Track isn’t much use without wheels, and in this case LEGO errs in the opposite direction, making wheels that are substantially smaller than those on real trains. (Obviously they have to be smaller – I mean that they’re much smaller even when you take scale into account!)
I haven’t considered steam engine wheels at all, but there’s not a lot of choice there from LEGO (though other manufacturers offer more). Steam locomotive wheels aside, and ignoring the comically small ‘small train wheel’ (50254), current LEGO wheels really only come in one size: the wheels that form part of a ‘train wheel assembly’ (2878, three variants) and the ‘Technic train wheel’ (55423). Both are solid wheels with similar proportions.
The main difference is that the 2878 wheel has a prototypical conical shape to the tread (the part that sits on the rail), while the Technic wheel is flat – which I had mistakenly thought was true for all LEGO wheels, hence my assertion in the last post that LEGO train wheels don’t work like real railway wheels – so not all LEGO train wheels!

To some extent the oversize flanges on LEGO wheels compensate visually for their small diameter (most rolling stock wheels these days seem to be somewhere in the 800–1100 mm diameter range). But it’s still not quite enough, and when the flanges are visible, the wheels do look very odd (to my eyes).
There are third-party wheels of different sizes (which I haven’t tried at all, because I’m still just dipping my toes back into the LEGO watery pool of trains or something). But I might consider doing so in the future if I get around to building anything coherent after all this cognitive dissonance!
One thing I should bear in mind though, if I do, is that replacing wheels with wheels of a larger tread diameter will inevitably lift the axle height and hence the entire vehicle. That might make the vehicle a better scale height, or it might mean that some height needs to be trimmed elsewhere.
Adjusting the axle height of vehicles will have consequences for clearance (remember vehicle gauge!), but perhaps the main impact will be on compatibility with unadjusted station platforms. We don’t want passengers having to climb in and out of trains! (Every decision we make has knock-on effects!)
Mind the gap
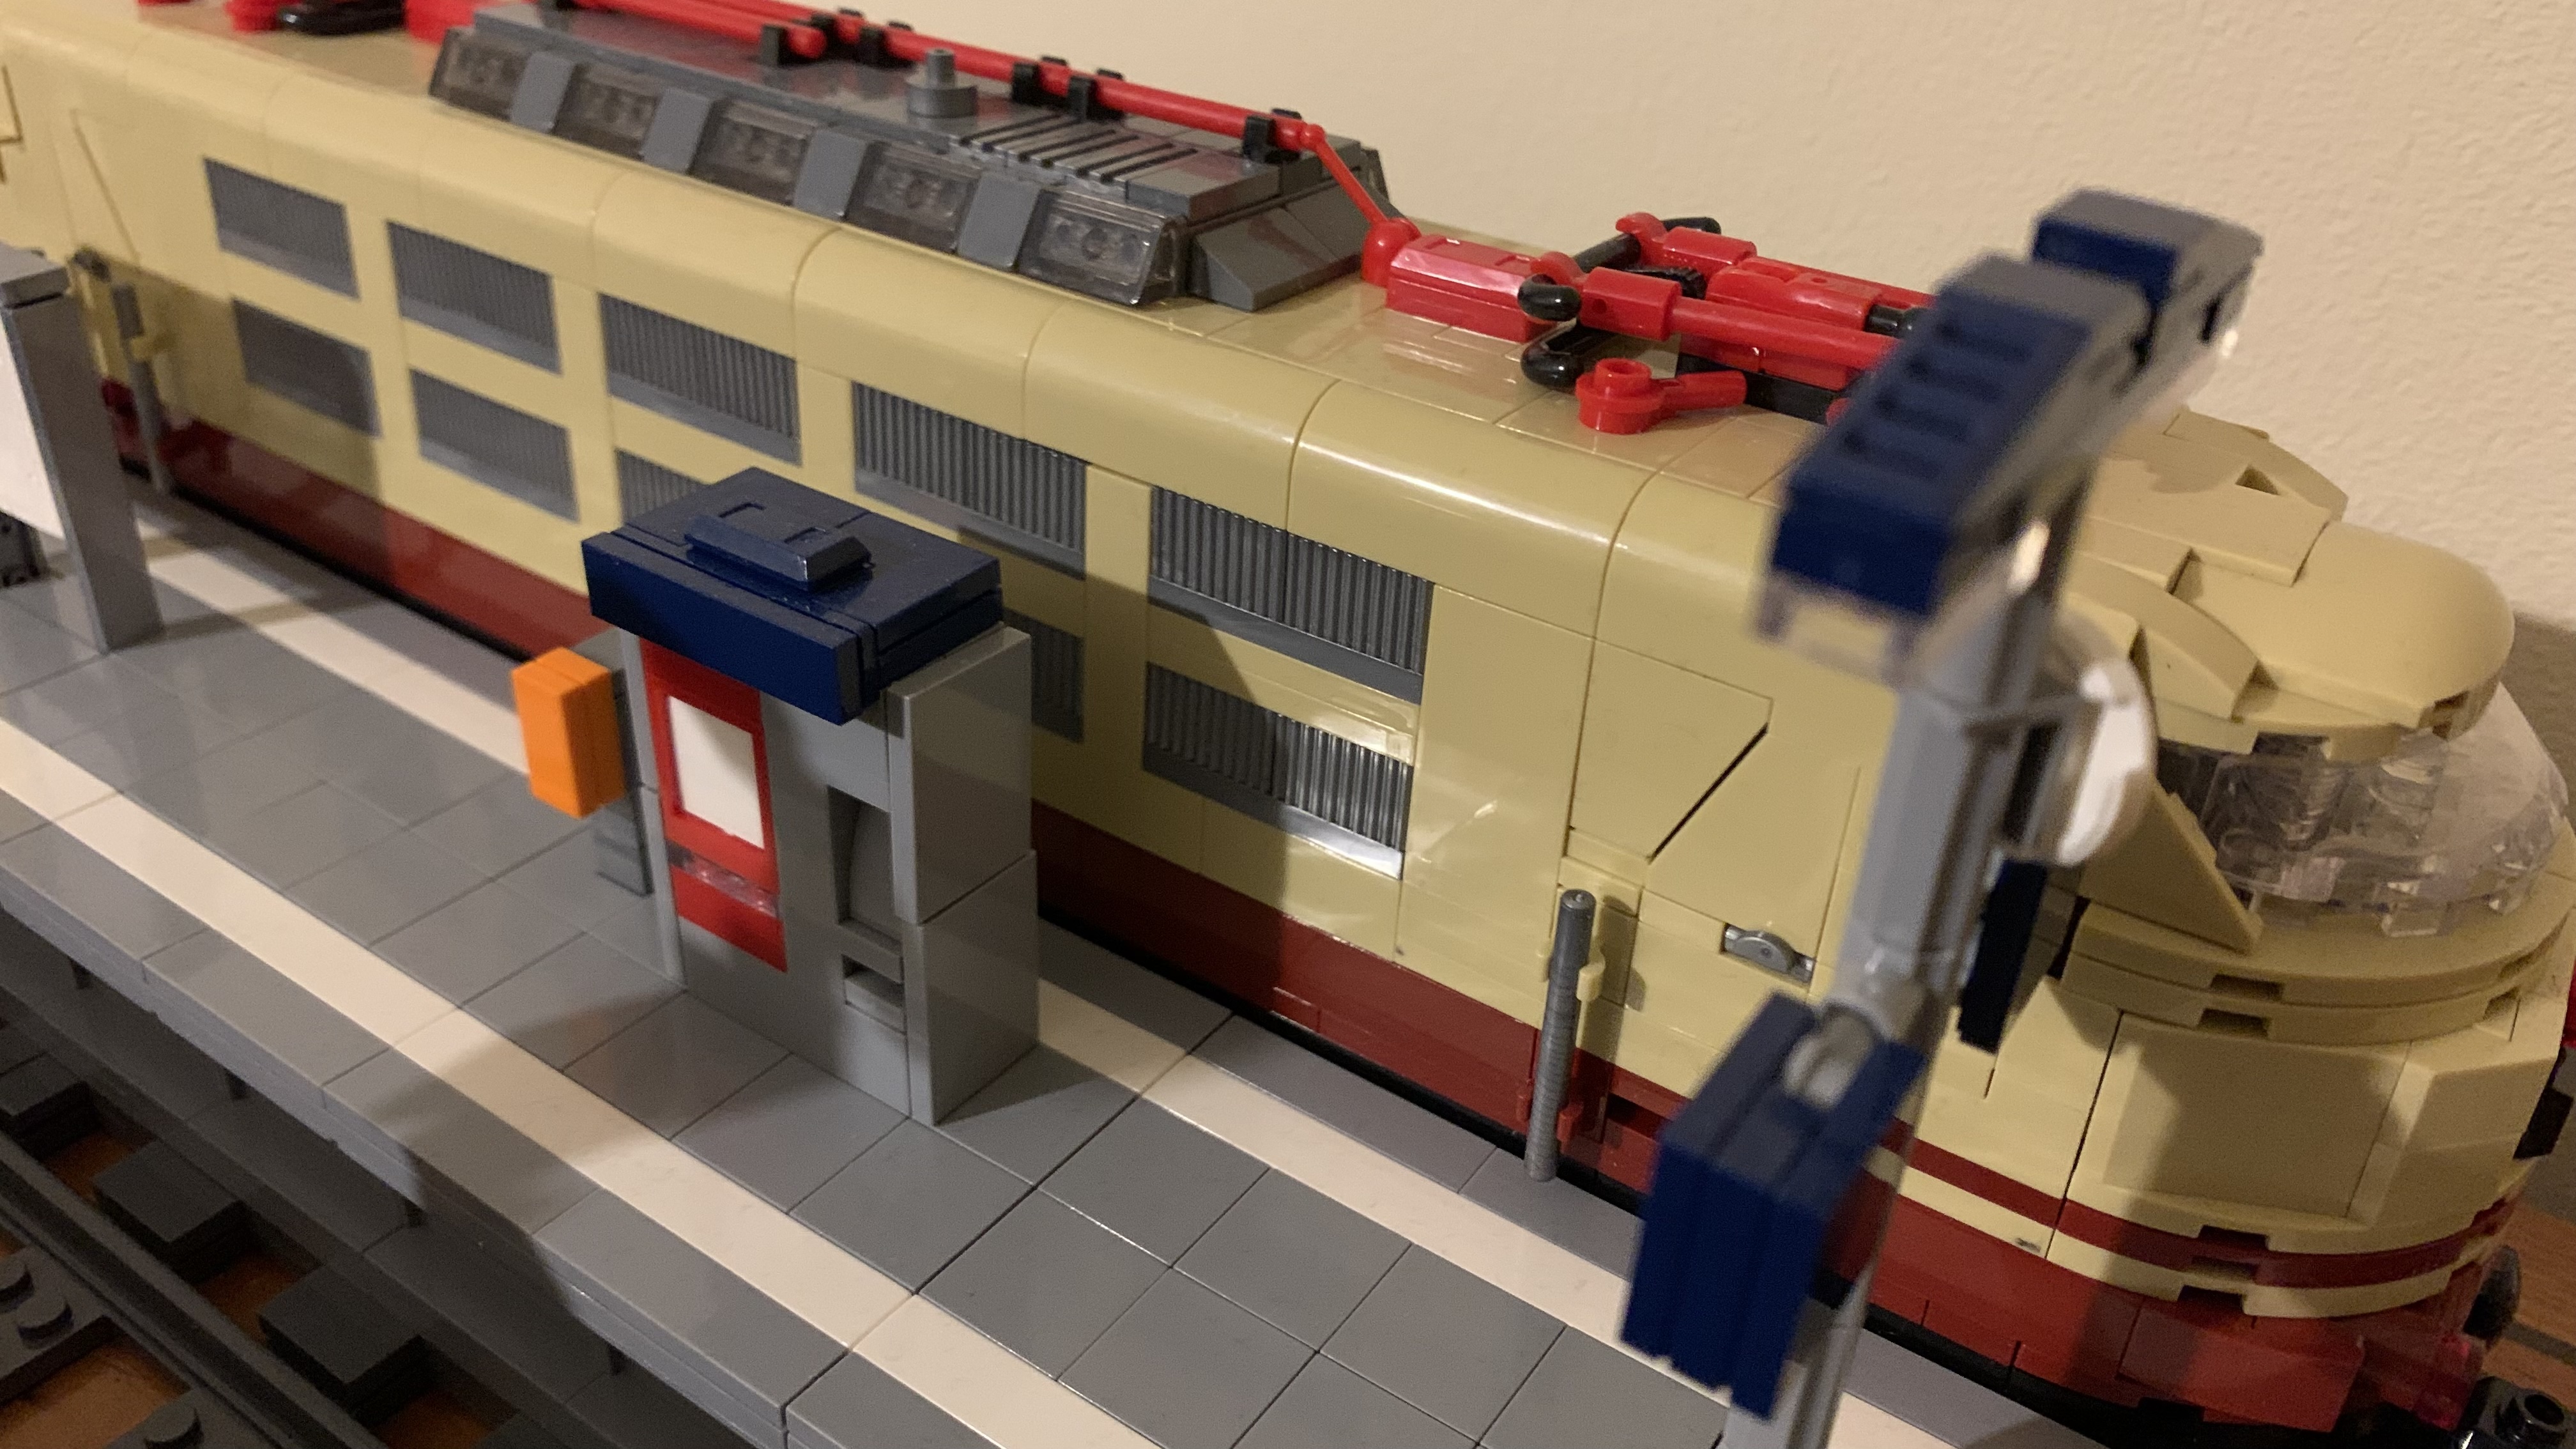
Remember when I said at the start of the post that I’d had a problem with platforms? It was nothing to do with wheel size. I encountered an incompatibility between the structure gauge of the platform set I’d built and the vehicle gauge of the locomotive set I’d built.
Practically all the trains LEGO has released are built to a vehicle gauge that is 6 studs wide (barring the odd handrail perhaps). They’ve done this since they first introduced trains into the LEGO world, whereas their cars have inexplicably doubled in size over the years.
And lots of people are perfectly happy with 6-stud-wide trains (often shortened to ‘6-wide’ or just ‘6w’). They can look amazing! But to have room inside for people – minifigs, mini-dolls or even just imaginary mini-friends – to move around and have a seat, you really need something wider. Also, though 6-wide trains tend to look fine from some angles, from the front they look as though they’ve been squished in at the sides and are now too tall for their width.
So to fit more detail in, and to make things a little better proportioned, many LEGO train builders create MOCs (‘my own creation’) that are 7-wide, 8-wide or even 10-wide. One downside is that they need more bricks, meaning they cost more to build and are heavier, which means they need extra motors to run, meaning they cost more to motorise. (I haven’t tried motorising anything yet, mainly because I don’t have the space to run anything more than a few centimetres!)
And another downside is that when you buy a platform kit or something else that has an 8-wide structure gauge, 6-wide locos and coaches (which most people have) will fit just fine, but an 8-wide locomotive isn’t going to have the necessary clearance, especially when the handrails and some bits of the underframe protrude slightly beyond the 8 studs!
Conclusions
After all that, I’m not sure I have a definitive answer to what LEGO model trains should look like, except that I realise I’m going to have to take a more relaxed attitude towards scale, and learn to live with compromise. (Can I do that?) I’ll also need to work out whether I want minifigs or, more likely, mini-dolls to travel on (and drive) my trains – if I ever have enough space to build a LEGO railway line that goes somewhere!
Whatever I decide to do, at least there are a lot more possibilities – yay, decision paralysis! – than there were back in my first LEGO era …

One response to “Choosing a scale for LEGO trains”
LEGO YouTuber Brick Sculpt has just released a short video looking at minifig scale, which provides another point of reference: https://www.youtube.com/watch?v=njo_jcCdxYA
And in the comments there, someone linked to the video by Shoot Your Bricks, looking at minifig scale and vehicles: https://www.youtube.com/watch?v=nznD1qLWit8 They briefly consider (American) trains, which they reckon should be 10 studs wide, going by minifig height. Luckily for me, European trains (and British trains in particular) are smaller!